Photo by Hannah Kaminsky. Used with permission.
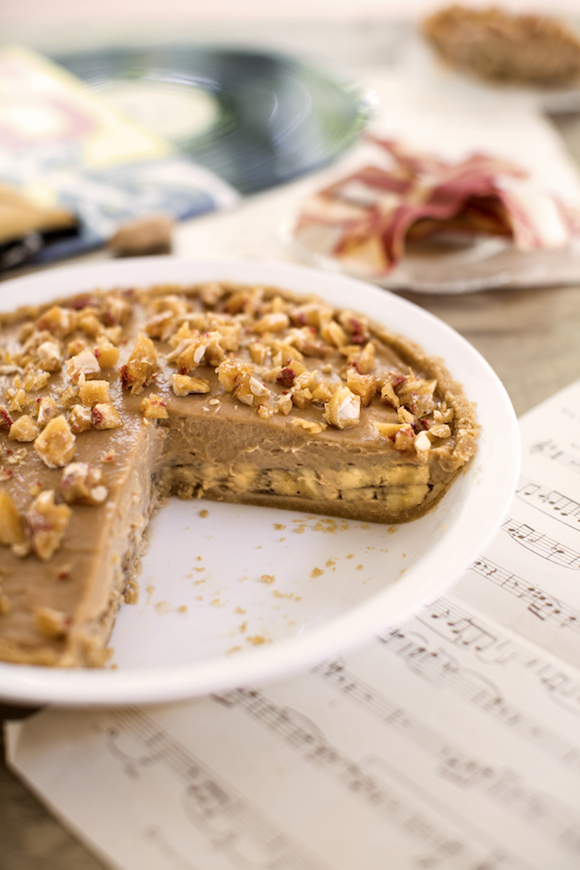
If ever a recipe perfectly summed up a cookbook, this Rock & Roll Elvis Pie does. Why? It’s out-of-left-field creative… who in the world would think of taking a long-dead singer’s favorite sandwich—peanut butter, banana, and bacon—and turn it into a VEGAN pie? And have that pie actually taste dreamy, rich, and decadently good? Hannah Kaminsky, that’s who. We’ll be giving away one copy on December 16th.
 The book contains the following chapters: Ingredients Glossary, Kitchen Tools & Toys, Essential Techniques, Troubleshooting, Crusts and Pastry Foundations, Accompaniments and Components, Custard Cream and Pudding Pies, Frozen Pies, Nut Pies, Fruit Pies, Wild Card Pies, and Savory Pies. I have tagged the following to try: coconut whipped cream, meringue, pepita parm(esan), lemon chia seed meringue pie, New York cheesecake pie, and mojito pie.
I started with vanilla cookie crumbs, substituting my gluten-free flour mixture for the flour. The crumbs baked up tasty, an easy win. I turned those into vanilla crumb crust.
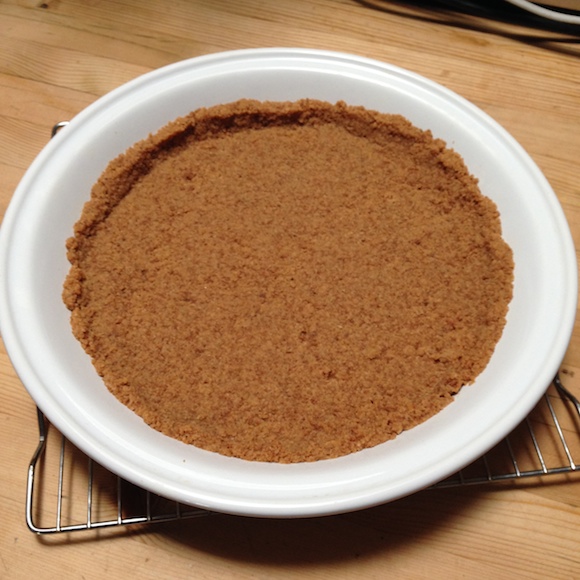
Crumb crust was a little tricky to get even. Tasted great.
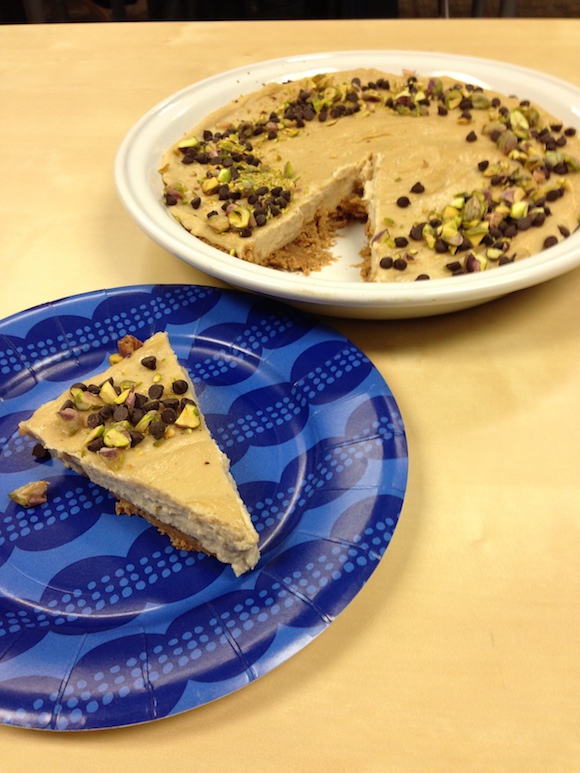
My only suggestion would be to grease the pan with coconut oil, as I had some trouble with it sticking. I filled that with her cannoli pie, another genius idea. It was a bit too sweet for me, but was a huge hit at the meeting I took it to, and The Husband loved it too. It definitely did not taste vegan.
You can see the crust stuck a little to the pie dish, but the taste was fantastic.
I made her coconut bacon recipe, very easy, although I worried there might be too much liquid smoke in the mix. But no, it was delish. I used that to make this decadent Rock & Roll Elvis pie (recipe below). This was a complex pie with multiple steps, and the ingredients were not listed in the same order as the instructions. The brittle took a lot longer than I expected to come to temperature, but ultimately came out delicious.

This was a half recipe. It was hard to get the “bacon” evenly dispersed throughout, but what a great sweet-and-salty combo.
The brittle was impossible to break into pieces by hand; I had to chop it with a big serrated knife. The peanut butter filling was easy to put together. My only critique is that I thought the pie could have used more banana, I would probably put a middle layer of bananas in it.

I made a half-recipe, and then shared it with the neighbors.
 Finally, I made the chocolate-chipotle-sweet potato pie. I used Bob’s Red Mill Gluten-Free All-Purpose Baking Mix for the chocolate crumb crust. I had to add more crumbs than called for, I’m wondering if it has to do with the gluten-free flour behaving differently? Anyway, the crust seemed to bake fine, and it was easy to add the mini chocolate chips to the hot crust and let them melt in. It wasn’t clear whether the crust was supposed to be somewhat cool before adding the filling, so I did all the dishes and then poured it in and baked it. It turns out I didn’t have tapioca flour, so I substituted arrowroot (which is usually fine) and hoped for the best. It didn’t seem even close to finished at 28 minutes; I baked it for 35. My only suggestion would be to add the mini chocolate chips to the filling instead of creating a layer on the bottom, as the pie was very difficult to cut and eat. It got rave reviews from everyone at my meeting, including this text afterwards: “Oh my GOOOOOOOOSH this cake/pie is ridiculously insanely supercalifragilisticallyabsolutely wonderful!“
What I liked about this book:
It’s a great size, full color, hardcover, and with excellent print quality. The photos are lovely. The writing style is friendly, helpful, funny, and excellently descriptive: “Whisk gently but constantly as the filling comes up to temperature, taking care to scrape the bottom and sides of the pan with the whisk to prevent sticking and burning. Wait for bubbles to break steadily on the surface before turning off the heat.” She gives several gluten-free crust options. The trouble-shooting chapter is excellent, and should allay any pie crust fears people have.

This pie is next on my list, despite the difficulties in reading the recipe.
I wasn’t so keen on:
Aspects of the design detract from both the user experience and the photographs. (From the looks of the covers, it appears this book follows the design standard from her two previous cookbooks.) Every single page is a different color, designed to match the pies, but many have very dark backgrounds with light type face, making the recipes extremely difficult to read (especially in lower-light kitchens). The brightly colored pages compete with the beautiful food photography and at times detract from the pictures. The color balance looks off on some of the photos. Gluten-free, soy-free, and nut-free recipes are not labeled. There are a few typos, especially in page references, which makes it a bit confusing. Having to flip back and forth for portions of the recipe make it more likely to miss a step.
Recommended for:
Vegans with a sweet tooth. The recipes all use sugar, some use corn syrup, and are all rich and decadent. Not a “healthy” dessert book, but great for people who entertain and want vegan recipes. Knowledgeable gluten-free & vegan bakers will navigate this well; she has one gluten-free crust (which I did not try because I didn’t have that specialty flour) but does suggest some other gluten-free options.
Hannah has graciously allowed me to share her recipe:
Rock ‘n Roll Elvis Pie
© Hannah Kaminsky. Used with permission.
Makes 10–14 Servings
The King of Rock and Roll was infamous for his legendary food cravings, the most famous being the peanut butter, banana, and bacon sandwich. Clearly the man was a gastronome ahead of his time, combining sweet, salty, and savory well before anyone knew what umami or flavor pairing was. It sounds crazy on paper, but give it the benefit of the doubt and just try a bite; for reasons not fully known, it just works.
1 Unbaked Vanilla Cookie Crust or Graham Cracker Crust (see recipe below)
Banana Layer:
2 Medium-Size Ripe Bananas, Cut into 1/4-Inch Slices
1/2 Teaspoon Lemon Juice
Peanut Butter Crème:
3/4 Cup Creamy Peanut Butter
1 12-Ounce Aseptic Package Extra-Firm Silken Tofu
1 Cup Confectioner’s Sugar
1/2 Teaspoon Vanilla Extract
1/4 Teaspoon Salt
Oinkless “Bacon” Peanut Brittle:
1 Cup Granulated Sugar
1/2 Cup Light Corn Syrup or Light Agave Nectar [I used agave]
1/4 Cup Water
1 Teaspoon Vanilla Extract
1 Teaspoon Baking Soda
1/2 Cup Roasted, Salted Peanuts
1/2 Cup Coconut “Bacon” (recipe follows)
The brittle will need ample time to cool, so that’s a good place to start when creating this pie. Set out a silpat on a baking sheet near the stove.
In a medium saucepan with high sides, combine the sugar, corn syrup or agave, and water over medium heat. Stir until the sugar dissolves, and then keep your spatula out of the pan to prevent crystals from forming. After the syrup comes to a boil, attach a candy thermometer to the side of the pan, and cook without stirring until the mixture reaches 290–300 degrees, or right between the soft and hard crack stage.
Immediately remove from the heat and stir in the vanilla, baking soda, peanuts, and “bacon.” Be cautious, as the mixture will bubble and sputter angrily. Very quickly pour the hot mixture onto your prepared baking sheet, using your spatula to distribute the goodies more evenly if necessary. Do not flatten the mixture, as you want those little air bubbles intact.
Cool for at least 15–20 minutes before breaking into raisin-sized pieces. Set aside or store in an airtight container at room temperature for 5–7 days.
As for the pie itself, first toss the banana slices with the lemon juice to prevent them from browning. Arrange them in an even layer at the bottom of your prepared crust, overlapping as needed to completely cover the entire surface. Stash the pie in the fridge while moving on to the crème filling.
Pull out your food processor or blender, and place all of the ingredients for the peanut butter crème inside. Pulse first to incorporate, and then turn it up to puree. Pause to scrape down the sides of the work bowl with your spatula, to ensure that there are no remaining chunks of tofu, and blend once more. When the mixture is completely smooth, retrieve your banana-lined crust and pour the crème on top. Smooth the filling with your spatula, and move the whole pie back into the fridge. Chill for at least 4–6 hours before slicing, and overnight to ensure the cleanest cuts.
Right before serving, sprinkle liberally with the chopped “bacon” brittle. [My note, if you will not be eating the entire pie, just put brittle on the cut pieces. It starts to melt in the fridge.]
Graham Cracker or Cookie Crust
Using a cookie crust for a pie is like getting two desserts in one forkful, which is why I love them so much. There are always some cookies, crackers, or crumbs on hand in my house, so I resort to this quick trick more often than I’d like to admit. Feel free to keep experimenting with new ingredients; finely crushed pretzels or chips make for a delightfully salty contrast to many sweet fillings.
1 3/4 Cups Graham Cracker Crumbs (About 14 Full Rectangle Crackers) or vanilla cookie crumbs
4–5 Tablespoons Non-Dairy Margarine or Coconut Oil, Melted
For a baked crust, preheat your oven to 350 degrees. Otherwise, don’t touch that oven!
For the best texture, be sure to pulse your cookie of choice in a food processor until very finely ground. The resulting crumbs should be about the consistency of coarse almond meal. Pick out any larger pieces and re-process as needed.
Drizzle the melted margarine or coconut oil into the crumbs, and stir thoroughly to coat everything evenly. The mixture shouldn’t be wet, but just moist, and capable of sticking together when pressed.
Transfer the mix to a 9-inch or 10-inch round pie pan, and use lightly dampened fingers to firmly press it down on the bottom and along the sides. Use the bottom of a flat measuring cup or drinking glass for smoother surfaces. If using a 9-inch pan, you may have more crumbs than needed, so feel free to remove the excess and either save it for future crusts, or bake separately on a flat baking sheet to create any easy sweet ice cream topping.
Use as is, or bake the lined pie pan for 10 minutes, until golden.
Coconut “Bacon”
Makes 2 cups
One would never guess that such unassuming ingredients combined in the right proportions would bear such uncanny resemblance to crispy, smoky bacon bits. In fact, the first time that distinctive aroma wafted from the oven, my meat-eating mother asked why it “suddenly smelled like salami in the kitchen.” For once, I’ll take that as a compliment! These coconut “bacon” pieces are so addictive that I often make a double batch to accommodate random snack cravings in addition to what’s called for in a particular recipe. Simply distribute the mixture between two separate baking dishes instead of one.
3 Tablespoons Soy Sauce
1 Tablespoon Liquid Smoke
1 Tablespoon Maple Syrup
1 Tablespoon Olive Oil
1/8 Teaspoon Ground Black Pepper
2 Cups Coconut Flakes
Preheat your oven to 300 degrees and set aside a 9 x 13-inch baking pan.
Stir together the soy sauce, liquid smoke, maple syrup, oil, and pepper in a large mixing bowl. Toss the coconut in and stir with a wide spatula, coating the flakes thoroughly with the liquids. Be gentle to prevent the coconut from breaking into smaller pieces.
Pour everything, including the marinade, into your waiting pan. Bake for about 28–32 minutes, stirring every 10 minutes or so to keep the entire batch cooking evenly. The flakes can burn very easily and surprisingly quickly, so stand by and keep a close eye on it the entire time it’s in the oven.
Cook until golden brown all over and highly aromatic. Be aware that your kitchen may smell like bacon for the rest of the day, but I would hardly consider that a problem. Straight out of the oven, the “bacon” will still be slightly soft to the touch but will crisp up nicely once cool.
Let cool completely and store at room temperature in an airtight container. The “bacon” will keep for up to two weeks in a dark, cool place.


I couldn’t have hoped for a better, more balanced, and thoroughly researched review! Thank you for giving all those recipes a try and reporting back with your honest assessments. I’m truly grateful!
Hannah, you are so very welcome. My colleagues, family, and friends are sad I am no longer making your recipes. :)